Sign up for our educator mailing list and stay up to date on new offerings.
This is an online professional development course for Jewish educators to learn stop motion animation. The best part? It’s free and self-paced so you can learn whenever and wherever. We’ll take you step-by-step through the stop motion animation process, from writing scripts, creating props and recording quality audio.
Recommended for middle and high school Jewish educators
Time required: 3 hours
Course Structure: Watch each video in order and do the assignments mentioned in the video. You will be prompted to download resources, which you can find next to each video below.
Pro Tip: Bookmark this page so you can come back to the course whenever you want.
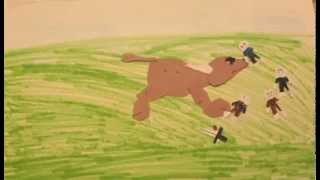
We’re going to show you how to take a text and work with students to turn it into an animated video. Why? Because when you take a text and make lots of research-based creative decisions about how it will look and sound in a video, it forces you to slow down and figure out stories very thoughtfully, sometimes creating new interpretations.

Shopping List
In this video we’ll write an animation script, based off of a text. While you could obviously do this with any short bit of text, we’re going to use Ecclesiastes, chapter 3 as our example.
Kohelet 3 Source Sheet (English only)
Shopping List
Animation Keywords Glossary
In this video, we’ll take your script and put it into a split script. Once you download our split script template, you’re looking at three columns. The first column is for words the narrator will be saying. The second column is for the pictures you’ll see while you hear the narration, and the third column is for any notes you have like describing a motion you want to do and how long that picture should be on screen for.
For now, we want to write each new thought of the script on a new picture. Basically, every place you could imagine having another picture, write another line of text.
Split Script Template
Split Script Example
Teaching Animation Lesson Guide
In this video, we’ll show you how to turn a split script, which is really a simplified “storyboard,” into what we in the biz call a “story reel” of your planned video.
This is an opportunity to see if your vision works. Do the images support the script? Have you planned too much? Too little? This rough draft will help you test your ideas. Not only will it show you exactly how long to pace your piece (more on that later) it also works as a quick test to see if the jokes are hitting and if your script is working, before going into the more labor intensive animation process.
Split Script Template

Story Reel Example (MOV)
Teaching Animation Lesson Guide
Before you can make your animation, you have to create an asset list. In order to make an asset list, you need to first have your story reel done – so make sure you have that, and then it’s time to make the visuals for real. First thing is to go gather your supplies.
Asset List Example
Shopping List
Teaching Animation Lesson Guide
Animation Keywords Glossary
Let’s make some props for animation! Do you have your paper and scissors in front of you? Well, go get them! You can refer to our shopping list to get everything you’ll need for this course going forward.
Shopping List
Cut Out Character Template
Animation Keywords Glossary
Teaching Animation Lesson Guide
In this video, we’ll walk you through how to use animation software on your phone. On your iPhone or Android phone, download an App called Stop Motion Studio – at the time of this video shoot, there was both a free and a $5 version – everything we’re going to do here works great with the free version.
Tech moves fast, and it’s possible you’re watching this video in a future without Stop Motion Studio. No worries. Just search for a stop motion app that runs on your phone. While we like this program, others will work great too.
Shopping List
Teaching Animation Lesson Guide
Once you’ve made a story reel and the props, it’s time to start everyone’s favorite part of animation – the math!
This step is crucial if you want your animation to actually take as long as the script needs. Which you do. Otherwise, you’ll finish animating and when you try to record audio, you’ll find out that you need to rush through your script in order to keep pace with the animation. Or worse – need to go back and reanimate parts.
Teaching Animation Lesson Guide
Here’s how to record your animation. First, put the camera on a tripod. Could you do it without a tripod? In theory yes, but it will be a very shaky video and frustrating, as every frame you’ll be working to not only move the characters, but also to keep the camera in place. Trust me. Getting a tripod will save you time and make the whole thing much more fun.
Additionally, it’s a good time to add in that desk lamp or clamp light we told you about in the shopping list.
Shopping List
Teaching Animation Lesson Guide
Student Roles and Responsibilities
In a professional animation, sound is one of the most important things that makes the piece feel great. That said, we’re learning about process, not making Oscar-winning shorts, so we’re going to teach you how to add your most simple soundtrack using your free stop motion software without making this complicated.
Look around your work space – if it’s a hard floor, big room, echo chamber like this one – demo – maybe find someplace smaller, carpeted, even a coat closet can work great.
Teaching Animation Lesson Guide
So…mazel tov! Congrats! You’re finished shooting. You recorded the audio. You added whatever music and sound effects you wanted to. And now you’re ready to show it to the world.
In this video we’ll show you how to export your video from the Stop Motion Studio App and share it with the world! If you decide to share your video on social media, be sure to tag us at @heybimbam and #BimBamAnimation
Teaching Animation Lesson Guide
Can I take this course if I am an elementary educator (grades K-5)?
Technically yes but we recommend this course for middle and high school students. Students ages 12+ have the spatial, motor and artistic skills necessary for the level of detail required for stop motion animation. If you’re up for a challenge and want to try it out with younger students, go for it but we can’t say we didn’t warn you!
What is the time requirements for this course?
We recommend at least 2-3 hours for you to take this course. As for teaching it to your students, we recommend at least 3 hours of class time. Take a look at our curriculum for more details.
Do you have resources to help me teach stop motion animation to my students?
Yes! Thanks for our Educator-in-Residence, we have put together numerous resources to help you teach stop motion animation to your students with confidence and ease. If you signed up for the course, you’ll receive these resources via email or check out our resources page.
Do you offer credit or certificates upon completion of the course?
Unfortunately we do not offer credit or certificates upon completion of our Teaching Animation course. But you do get to call yourself a rockstar educator with stop motion animation skills under your belt!
What if I have technical issues with the Stop Motion Studio App?
You can either contact Stop Motion Studio App directly, join our Facebook group and ask fellow educators or ask us! We might not have the answer but we’ll do our best.
What if I have a question about the course? Who should I contact?
Join our private Facebook group to ask fellow Teaching Animation course participants or send us an email at stopmotion(at)bimbam(dot)com
*By signing up for our Teaching Animation course, you agree to receive our general BimBam email list, which includes our weekly e-newsletter full of great educational resources.
The development of this program was made possible in part by funds granted by the Covenant Foundation. The statements made and the views expressed in the individual projects, however, are solely the responsibility of the artists.
Keep up to date with the latest videos and news from BimBam